
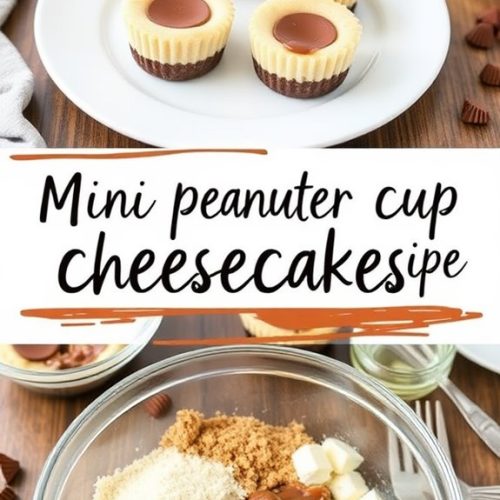
Mini Peanut Butter Cup Cheesecakes combine creamy peanut butter and rich cream cheese for a delicious treat. They feature a chocolate graham cracker crust and a mini peanut butter cup at the center. This dessert is not only easy to prepare but also allows for personalized toppings. Understanding the history and preparation of these bite-sized desserts can enhance the experience. Explore the recipe and discover how to make these delightful cheesecakes for any occasion.
Why You’ll Love This Recipe
Many people will appreciate this recipe for Mini Peanut Butter Cup Cheesecakes because it combines the rich flavors of creamy peanut butter and smooth cheesecake in a delightful bite-sized format.
The chocolate graham cracker crust adds a crunchy texture that perfectly complements the creamy filling. Each cheesecake features a mini peanut butter cup, creating a burst of flavor in every bite.
This recipe is simple to follow, making it ideal for both beginner and experienced bakers. Additionally, the option to customize with various toppings allows for creativity while serving as a sweet treat for any occasion or gathering.
History
The history of cheesecakes dates back to ancient Greece, where they were served to athletes during the first Olympic Games in 776 B.C. The Greeks made their cheesecakes using simple ingredients like cheese, flour, and honey.
This dessert gradually spread to Rome, where the Romans added eggs and other flavors. Over centuries, various cultures have contributed to its evolution, leading to the modern cheesecake we know today.
In the United States, the introduction of cream cheese in the 19th century significantly transformed the recipe. Today, cheesecakes come in countless flavors, including the popular mini peanut butter cup variation.
Recipe
Indulge in the delightful taste of mini peanut butter cup cheesecakes, a perfect blend of creamy cheesecake and rich peanut butter flavor. These mini treats boast a chocolate graham cracker crust and are filled with a luscious peanut butter and cream cheese mixture. Each cheesecake is topped with a mini peanut butter cup, making them not only visually appealing but also an irresistible dessert that will satisfy any sweet tooth.
These cheesecakes are ideal for gatherings, parties, or simply as a sweet treat to enjoy at home. With a straightforward preparation process, you can whip up a batch of these mini cheesecakes in no time. Plus, they can be made ahead of time and stored in the fridge, allowing you to enjoy them whenever the craving strikes!
Ingredients
- 1 ½ cups chocolate graham cracker crumbs
- ½ cup melted butter
- 8 oz cream cheese, softened
- ½ cup creamy peanut butter
- ½ cup granulated sugar
- 2 large eggs
- 1 tsp vanilla extract
- 12 mini peanut butter cups
- Optional toppings: melted peanut butter, melted chocolate, whipped cream
Instructions
- Preheat your oven to 325°F (165°C) and line a muffin tin with cupcake liners.
- In a mixing bowl, combine the chocolate graham cracker crumbs and melted butter. Stir until well mixed, then press the mixture into the bottom of the cupcake liners to form the crust.
- Bake the crust in the preheated oven for 5 minutes, then remove and let cool before adding the filling.
- In a large mixing bowl, beat together the softened cream cheese and creamy peanut butter until smooth. Gradually mix in the granulated sugar, followed by the eggs and vanilla extract until everything is well incorporated.
- Place a mini peanut butter cup in the center of each cooled crust. Pour the cheesecake filling over the peanut butter cups, filling each liner almost to the top.
- Bake the cheesecakes in the oven for 18-22 minutes, or until the centers are set with a slight jiggle. Once baked, cool in the pan for 10 minutes before transferring to a wire rack.
- Refrigerate the cheesecakes for at least 2 hours to allow them to set completely. Before serving, drizzle with melted peanut butter and chocolate if desired.
For best results, ensure that your cream cheese and eggs are at room temperature before mixing, as this will create a smoother batter. Avoid overmixing to prevent cracks in your cheesecakes, and allow them to cool completely before refrigerating to achieve the perfect texture.
These mini cheesecakes can be stored in the fridge for up to 3 days or frozen for up to 2 months, making them a convenient and delicious dessert option. Enjoy your baking!
Final Thoughts
After exploring the delightful process of making mini peanut butter cup cheesecakes, it is important to consider some final thoughts on this recipe.
This dessert not only impresses with its creamy filling and chocolatey crust, but it also offers versatility. Variations can cater to different tastes, making it suitable for various occasions.
Proper cooling and refrigeration are essential for achieving the best texture. Additionally, these mini cheesecakes can be made ahead of time, enhancing convenience.
With a straightforward preparation process, they are an excellent choice for both novice and experienced bakers looking to create a delicious treat.
FAQ
Many people wonder about the best way to achieve a smooth filling. Using room temperature cream cheese and eggs helps create a creamy texture.
Others may ask how to store leftovers; these cheesecakes can be refrigerated for up to three days or frozen for two months.
A common concern is whether the cheesecakes will crack; avoiding overmixing the batter can help prevent this.
Finally, some might inquire about gluten-free options, which can easily be made by substituting gluten-free graham crackers for the crust.
Ingredients
- Ingredients
- 1 ½ cups chocolate graham cracker crumbs
- ½ cup melted butter
- 8 oz cream cheese softened
- ½ cup creamy peanut butter
- ½ cup granulated sugar
- 2 large eggs
- 1 tsp vanilla extract
- 12 mini peanut butter cups
- Optional toppings: melted peanut butter melted chocolate, whipped cream
Instructions
- Instructions
- Preheat your oven to 325°F (165°C) and line a muffin tin with cupcake liners.
- In a mixing bowl, combine the chocolate graham cracker crumbs and melted butter. Stir until well mixed, then press the mixture into the bottom of the cupcake liners to form the crust.
- Bake the crust in the preheated oven for 5 minutes, then remove and let cool before adding the filling.
- In a large mixing bowl, beat together the softened cream cheese and creamy peanut butter until smooth. Gradually mix in the granulated sugar, followed by the eggs and vanilla extract until everything is well incorporated.
- Place a mini peanut butter cup in the center of each cooled crust. Pour the cheesecake filling over the peanut butter cups, filling each liner almost to the top.
- Bake the cheesecakes in the oven for 18-22 minutes, or until the centers are set with a slight jiggle. Once baked, cool in the pan for 10 minutes before transferring to a wire rack.
- Refrigerate the cheesecakes for at least 2 hours to allow them to set completely. Before serving, drizzle with melted peanut butter and chocolate if desired.
- For best results, ensure that your cream cheese and eggs are at room temperature before mixing, as this will create a smoother batter. Avoid overmixing to prevent cracks in your cheesecakes, and allow them to cool completely before refrigerating to achieve the perfect texture.
- These mini cheesecakes can be stored in the fridge for up to 3 days or frozen for up to 2 months, making them a convenient and delicious dessert option. Enjoy your baking!